Run a TFTP Server for Network Device Setups
...on Mac OS X or macOS
If you’re working with networking devices such as switches, routers or firewalls, to upgrade their firmware, you more often than not need a TFTP server. Here’s how to use the one included with Mac OS X or macOS.
Preparation
Mac OS X has a tftp server included, and you just have to start it and do a little configuration.
I found and set it up this way:
Find appropriate commands
Use the apropos command to see if there are any commands related to tftp. From Terminal:
apropos tftp
The command replies:
tftp(1) - trivial file transfer program
tftpd(8) - DARPA Internet Trivial File Transfer Protocol server
Since the commands exist, you can use man to get more info. We would want the server version of this command, so that is the one with the d suffix (d is for “daemon”).
man tftpd
Looking at these results and Apple’s online version of the man info, we see it says:
This server should not be started manually; instead, it should be run using launchd(8) using the plist
/System/Library/LaunchDaemons/tftp.plist. It may be started using the launchctl(1) load command; refer to the documentation for that utility for more information.
Start tftpd
The man file gives you the plist to use, so, you just start it with launchctl:
sudo launchctl load -F /System/Library/LaunchDaemons/tftp.plist
… and tftpd will start. Supply your password when sudo prompts for it.
You can confirm it’s running using netstat to check what is listening on its port, traditionally port 69.
netstat -na |grep \*.69
It will show:
udp6       0      0  *.69                   *.*
udp4       0      0  *.69                   *.*
Serve a Firmware File
Now that the tftpd server is started, you need to put the firmware binary file in a specific location for the tftpd to be able to serve it to a requesting device. Namely your firmware files should be saved to /private/tftpboot. The tftp.plist file looks like this:
<?xml version="1.0" encoding="UTF-8"?>
<!DOCTYPE plist PUBLIC "-//Apple Computer//DTD PLIST 1.0//EN" "http://www.apple.com/DTDs/PropertyList-1>
<plist version="1.0">
<dict>
	<key>Disabled</key>
	<true/>
	<key>Label</key>
	<string>com.apple.tftpd</string>
	<key>ProgramArguments</key>
	<array>
		<string>/usr/libexec/tftpd</string>
		<string>-i</string>
		<string>/private/tftpboot</string>
	</array>
	<key>inetdCompatibility</key>
	<dict>
		<key>Wait</key>
		<true/>
	</dict>
	<key>InitGroups</key>
	<true/>
	<key>Sockets</key>
	<dict>
		<key>Listeners</key>
		<dict>
			<key>SockServiceName</key>
			<string>tftp</string>
			<key>SockType</key>
			<string>dgram</string>
		</dict>
	</dict>
</dict>
</plist>
Symlink the tftpboot folder
You used to be able to change the tftpboot path, but OS X El Capitan and later macOSs have stronger security via their “SIP” system which makes things more difficult. Just symlink the tftpboot to a folder you have full control over. You can do it like this:
cd /private/
sudo rm -rf tftpboot
mkdir /Users/myuser/tftpboot
sudo ln -s /Users/myuser/tftpboot tftpboot
sudo launchctl unload -F /System/Library/LaunchDaemons/tftp.plist
sudo launchctl load -F /System/Library/LaunchDaemons/tftp.plist
That being said, please note that I tested a fresh macOS Sierra install directly on /private/tftpboot, and tftp get and put from another Mac worked fine without the symlink in place, so YMMV. I confirmed with csrutil status that SIP is indeed enabled on my fresh macOS.
Japanese Mac keyboards don’t handle reverse solidus \. To enter one you can press option-¥.
Japanese Mac keyboards don’t handle reverse solidus \. To enter one you can press option-¥.
Copy firmware file into position
Now let’s serve a file. Let’s say we download a firmware for an HP switch, and want to upgrade its firmware to that version. The file downloaded is F_05_80.swi and is saved to our Downloads folder. Let’s move it to the correct folder, and set its permissions.
cd /Users/myuser/tftpboot
cp ~/Downloads/hp/F_05_80.swi .
ls
chmod 766 F_05_80.swi
Get firmware file from tftpd


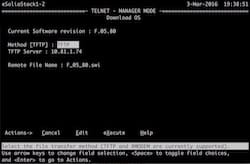
It differs by each device you’re upgrading, but typically you would set these:
- Method of upgrade: select
tftpusually. - IP address of
tftpdserver. This is the IP of your mac. - Name of firmware file. Enter the exact name, getting the case exactly right.
Then there is usually a way to “execute” the transfer by a command or menu. Once the firmware is transferred and loaded, your device will usually restart.
Click the screenshot to see what it looks like on an HP switch.
Put a file from a device to tftpd
Sometimes you want to save a file from the device, to your tftp server. The tftp protocol is dumb and requires no authentication, so you need to specify in advance what the received filename will be. Use touch to do that.
Be sure to get the name exactly right, as mis-spellings are a common cause of errors here.
Be sure to get the name exactly right, as mis-spellings are a common cause of errors here.
touch ~/tftpboot/catalyst.conf
chmod 766 ~/tftpboot/catalyst.conf
Now you have a blank file that will be overwritten, when you specify it from your remote device. Make sure you specify exactly the same filename.
Stop tftpd
Be sure to unload the service when you’re not using it:
sudo launchctl unload -F /System/Library/LaunchDaemons/tftp.plist
netstat -na |grep \*.69
The aforementioned netstat command should return nothing.
Alternatives
There are a couple of GUI alternatives you can try, though I have not done so myself:
I hope this information helps someone.