On Learning to Code
... a beautiful endeavor
You’re interested in ‘programming’ or ‘coding’, and don’t quite know where to start? That’s understandable. The topic of software development is epic and daunting, but at the same time it’s a beautiful & worthy endeavor. If you’re just starting out, you have a wonderfully rich opportunity ahead of you.
How to start
As for me, I started programming when I was a teen, tapping BASIC programs into my Texas Instruments TI-99/4A, connected to my TV. I didn’t have the optional tape recorder for memory, so I got pretty fast at typing. I had to shut it down when it was dinner time, so necessity dictated some typing skill.
First of all, let’s think about what this is. If you’re a university student going through a course of study with the aim of a career in software engineering, you’re going to have a different path from someone who is self-taught. Some of the most famous and influential software developers are self-taught, and thinking back, there used to be no formal course of study for software engineering anyway. Both paths are valid, and those taking either can learn something from the other.
The following admittedly-opinionated path, is one relatively inexpensive way you could learn to code. It starts simple and gets more complex, adding layers or more difficult-to-grok tasks, as it proceeds. It does not include all “how to” information on purpose; you can get that in many places elsewhere.
Expect it to take a while. You can come back periodically to read and reflect. As you proceed, think on the difference between what might be called “component assembly”, and formal software engineering where you’re writing and compiling binaries.
Preparation
I see a lot of people posting in support forums, strugging to make Windows “speak Linux”. It just doesn’t work very well.
I see a lot of people posting in support forums, strugging to make Windows “speak Linux”. It just doesn’t work very well.
What do you need to get started? I would recommend a Mac or Linux system. Windows is possible and even needed if you’re developing specifically for Windows, but for standards-based websites and opensource code, a lot of devs use Mac or Linux. If you use Windows in that case, it will be harder to get help in my opinion.
You might also look into “cloud IDE ” services, like Codio, Nitrous, Codebox, Koding, Codiad, or Cloud9. These provide an integrated development environment in a web browser, so that you can get started quickly, without worrying about what’s on your machine. Some of these services offer free options.
You’ll observe that editor comparisons are like religious wars!
You’ll observe that editor comparisons are like religious wars!
If you don’t want to use a Cloud
IDE
, then at least get yourself a decent programmer’s editor to use on your system, like Github’s Atom or Sublime Text, or, for the hardcore, vi, vim, or emacs. Don’t just use TextEdit on Mac or —gasp— Notepad on Windows.
Besides the basics of how to use whatever text editor you choose, there are a few common things to start learning about:
- Use Editor Config for editor setting consistency. Not all editors support it, but it’s really useful, so you should use one that does.
- Use Linters to check your code for errors.
- Save files in plain text, utf-8 format only.
- Set your editor to use only unix-style LF (
\n) line endings. - Use 2 spaces per indent, to show structure. Don’t use tabs.
- Use line length of 80 or less.
By the way, there are indeed IDEs to use locally such as Eclipse, Xcode, Emacs, NetBeans. An IDE is not just the the source code editor, rather it’s a complete development environment including build automation, linting, debugging, compiling and other features.
You need a solid way to take notes, and keep organized. One service I use and love is Pinboard. It’s minimalist, and just lets you keep bookmarks and notes, but it will help you stay organized. For instance, here’s my list for cloud IDEs, and a note about Mac Screenshot and Annotation Tools. You might also use an app for journaling or writing, such as Mac Ulysses, or Evernote in the cloud. Or, oddly enough, you could go Chatwin and use an analog Moleskine.
One Mac and iOS app that’s really slick is Kapeli Dash. It’s a real god-send for programmers, and makes documentation for just about everything software development-related available offline, as well as lets you store code snippets. You can get it for iOS, if you don’t use a Mac.
By the way, can you touch type? Now’s a good time to start learning. Computer programming requires a lot of typing, and it’s a huge pain if you cannot type. Take a month and learn how. It will really serve you well, whatever career path you take.
Simple Starter Steps
So, shall we get on with the steps already? This is not a step-by-step tutorial, but rather more of a set of “macro” steps. You’ll need to search and find resources using Google, which you should take the time to get good at and then even better at. If you stick to the spirit of each major step, you’ll get a pretty good foundation.
1. Build a Simple, Static Website
Learn HTML5 , CSS3 and basic javascript , and create a completely static and simple website. Of those three technologies, only javascript is an actual programming language. HTML is a markup language for specifying the structure of websites and pages, and CSS is another markup language for specifying the style of how something looks in the web browser.
There’s tons of info about HTML on the Internet, but I think you should focus on HTML5 . The HTML5 boilerplate is a good starting point. Here is a good basic tutorial for a manual site.
When you build the page, don’t copy paste the lines. Type in every line of code yourself (there’s that touch typing again).
You might find hosting services that are cheap and offering “unlimited” space. There’s no such thing, in reality. An Amazon AWS S3 “bucket” is a good inexpensive (albeit a bit technical) possibility for hosting a static site, as well.
You might find hosting services that are cheap and offering “unlimited” space. There’s no such thing, in reality. An Amazon AWS S3 “bucket” is a good inexpensive (albeit a bit technical) possibility for hosting a static site, as well.
You can test a static page like this simply by opening the index.html in a browser. Just double click it. If you want to host the site for real, you’ll need web space. A good option is Webfaction, which allows you both shell and
FTP
access. At first, the easiest thing is to use Webfaction’s dashboard to create a container for your site, setting it up per their documentation, and upload your files to your site’s folder.
Speaking of
FTP
, you can
FTP
from the terminal, but, most people use a
GUI
client like Filezilla, Panic Transmit or Cyberduck. You enter your credentials in their interfaces, and use them to upload and set permissions for folders and files. You can also use rsync from your Terminal, which ends up being a lot quicker.
For experienced programmers, “hello world” examples are old hat. It’s a tradition to have one, as the initial example for any language or system. Even if it’s simple, you should go ahead and do it anyway.
For experienced programmers, “hello world” examples are old hat. It’s a tradition to have one, as the initial example for any language or system. Even if it’s simple, you should go ahead and do it anyway.
Learn about
javascript
basics, using Mozilla’s “Hello World” example, and try the examples out on your test page or on a new page, like index2.html which you can store in the same folder as your other files.
Useful web services to help you build and test your code are Codepen, JSFiddle, and JSBin.
You’ll get information overload as you browse, but For now:
- Don’t get into XHTML or any sort of older CSS version.
- Eschew any sort of automation - type it out & do it manually.
- Forget about CMS content management systems such as Wordpress or Drupal.
- Ignore the details of browser compatibility.
- Don’t worry about “server-side” processing, as with PHP or ASPX .
- Forget about anything like ember, react or angular which are for building large web apps, not small, static sites.
2. Learn “Source Control”
Although there are a large number of source code version control systems, learn how to use the popular git at your command line, and get a free Github account to use. Start with Github’s Hello World tutorial to understand the basic flow, and then go through the Pro Git online book. Besides repositories, Github lets you store what they call “Gists”, which are named collections of files or snippets. Browsers and editors often have plugins to help you work with Gists. When troubleshooting, and asking help in a forum, you can put a log or config file in a gist, and paste its URL.
A good exercise is to redo your simple website from above, going through the steps again, but this time, checking every change into your repository, and pushing up to Github.
Take the time to learn how to comment your code in your HTML , CSS and javascript files. The syntax for comments is different in each. Also, learn how to write a good git commit message, and keep in mind Thom Parkin’s “Gititudes”. Software development is often collaborative, so be kind to your colleagues and to your future self.
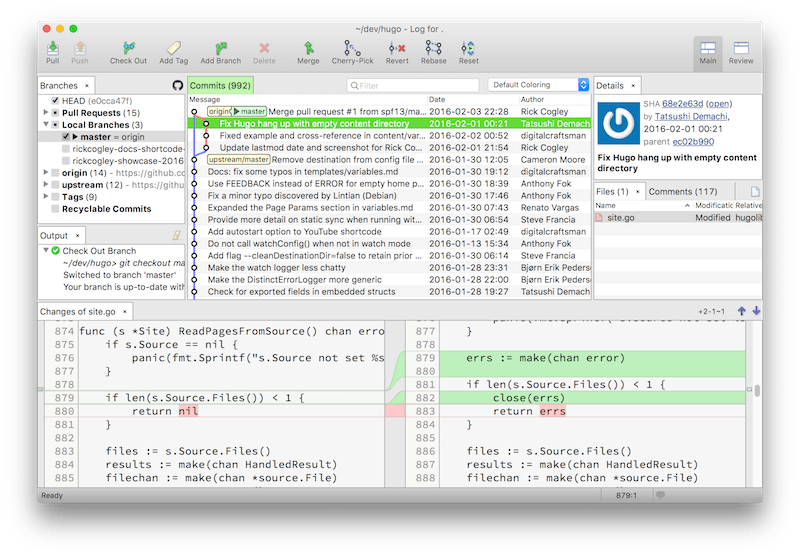
Note, you’ll discover that there are several
GUI
clients for git, namely Github Desktop (free), Syntevo SmartGit (commercial), and Atlassian SourceTree (free). You’ll also discover Bitbucket, a Github alternative which I like because you can create private repositories for free (as of Feb 2016).
For now:
Mercurial “Hg” is a well-respected and polished version control system that is used by many companies.
Mercurial “Hg” is a well-respected and polished version control system that is used by many companies.
- Don’t bother with other source control systems like CVS , Subversion, Bazaar or Mercurial (although they might be used as a standard at some companies).
- Don’t skip this step. Bear down and learn the basics of git now.
- Lean toward using
giton the command line, before you get used to a GUI client. - Don’t worry about learning everything about
gitbecause, it’s a huge subject in and of itself. Just learn the basics, such as how to initialize a folder for use in git, how to add files and commit them to the repository, and how to push to a remote at Github.
3. Incorporate a CSS library

Next, you could try incorporating a
CSS
library. Basscss is one with great fundamentals that let you set a consistent style for your site, and will work well with any site. One way to use it, is to declare it in your <head> like so:
<head>
...
<link href="https://unpkg.com/basscss@8.0.0/css/basscss.min.css" rel="stylesheet">
...
</head>
N.b.: that’s how you do it with basscss version 8 as of 15th Feb 2016, but please confirm in the docs.
There are some really comprehensive frameworks out there, as well, such as Foundation or Bootstrap. I would question whether you need such things, and try to figure things out on your own.
There are some really comprehensive frameworks out there, as well, such as Foundation or Bootstrap. I would question whether you need such things, and try to figure things out on your own.
You then use it by assigning its classes to your html, something like this:
<div class="bg-teal p1"></div>
That would make the div’s background teal, and put padding on it.
While you’re coding css, one of the most frustrating things is not being able to visualize how things are fitting together and impacting one another on your pages. Here’s just the medicine for that ill: check out Pesticide from Adam Morse.
For now:
- Avoid giant frameworks, and learn something minimalist. Basscss really helps you focus.
- Start with just declaring the basscss
CSS
from
<head>even though there are other methods to use it.
4. Use a Static Site Generator
A “Static Site Generator” or “ SSG ” means to make it easy to use HTML “templates” to merge your CSS , javascript , images and content into a publishable website. You run a command, the SSG does its merging magic, and voilà! you have a folder which you can upload to your website folder. Once you have built a number of pages manually, you’ll appreciate what an SSG brings, because it really makes short work of merging changes to a bunch of, say, blog posts.
Hugo is quite probably the fastest SSG on the planet. Reading the website, we learn that:
Github has an SSG called “Jekyll”, which is built on the Ruby language. I moved away from a Ruby-based SSG to Hugo, due to its simplicity.
Github has an SSG called “Jekyll”, which is built on the Ruby language. I moved away from a Ruby-based SSG to Hugo, due to its simplicity.
Hugo is written for speed and performance. Great care has been taken to ensure that Hugo build time is as short as possible. We’re talking milliseconds to build your entire site for most setups.
In fact, it takes far longer to upload the site to your web space, than it does for Hugo to generate it.
Hugo is downloadable as a single binary file, written in the Go language, which means it will run on just about any platform, just by running the binary. There are no complex installations and dependencies to deal with, unlike some other systems. That means, things are much easier when you upgrade your system OS. The content is easy too: it’s written in the rather ubiquitous Markdown format.
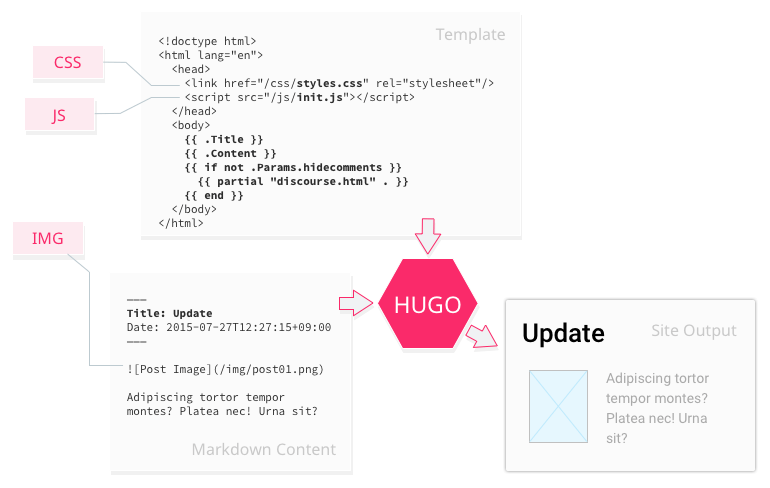
Next, a good exercise would be to “templatize” and expand your site and use Hugo to prep it for publishing. You could start with a simple “theme” for starters, and then adapt that to the design you’ve been working on. For example, in a Hugo template, you use Golang template codes to pull in aspects of your pages. You would write your content files with a YAML “frontmatter” header, within which you put “metadata” about the page, such as the date published or the title.
The YAML frontmatter, placed at the top of your Markdown content files, looks something like this:
---
title: On Learning to Code
subtitle: ... a beautiful endeavor
banner: /img/Cogley-Banner-Punch-Card-Operator-1400x450-mono.jpg
date: 2016-02-07T8:12:00+09:00
---

This is my **content**.
...
As you work through this process, you may have a chance to participate in open source projects. Remember: courtesy, “don’t be a jerk” and, “don’t worry about jerks” either. People are participating for free, so do what you can do, to help and be patient. Check your privilege at the door.
As you work through this process, you may have a chance to participate in open source projects. Remember: courtesy, “don’t be a jerk” and, “don’t worry about jerks” either. People are participating for free, so do what you can do, to help and be patient. Check your privilege at the door.
Then, your templates reference your pages’ frontmatter sections via codes like {{ .Title }} or {{ .Date }}. Hugo replaces these with the actual values, upon site generation. This is what my “single” template for this very site looks like. I’m using basscss classes here.
{{ "<!-- ENTERING layouts/_default/single.html -->" | safeHTML }}
{{ partial "header.html" . }}
<body class="charcoal bg-teal">
{{ partial "bodytop.html" . }}
{{ partial "headerbanner1.html" . }}
<main role="main">
  <article>
    {{ partial "singletop.html" . }}
    <section id="articletext" class="m0 px4 bg-lightpaperfibers">
    ...
As before, the Hugo project folder becomes your git project folder, and you should make the effort to get used to doing the git commands as you proceed. It’s quite good to be able to go back and look at every change you made, and see what changes or fixes were made.
For now:
- On your first pass through building a site in Hugo, don’t try to use every single feature. Sometimes, just because you can pull a value from the config, a page, or a data file, does not mean you really need to.
5. Learn a ‘build system’
If you’ve taken the time to do all the above macro steps, it might be a good time to learn how to use a “build system”. There are truly an eye-watering number of options to select from, but one modern scenario is one based on Node.js, where you would:
- Install
Node.jsas the modern base framework. - Use
npmto installnodeappspostcssand its pluginscssnextandautoprefixeretc. - Use
gulpto tie it all together, building compressed bundles of CSS and js to use in your site’s<head>.

Basically you would run a gulp process that watches specific folders, and takes the
CSS
and
javascript
in those, concatenates separate files into fewer, compresses, adds browser prefixes and even lets you use
CSS4
and so on. One solid base framework for this sort of setup is Jayden Seric’s “Barebones”.
I started by kicking the tires of Barebones, weaved in some basscss, and did a little tweaking in my gulpfile.js to let me use the whole thing with Hugo. With this setup, to develop a site I:
- Create test
index.htmlpages that reference mybundle.cssandbundle.js. - Edit the html of the indexes, and the component CSS and javascript , after which gulp does its magic and compiles them to the bundle files.
- Get the test pages basically looking right in the
npmweb server. - Rinse and repeat.
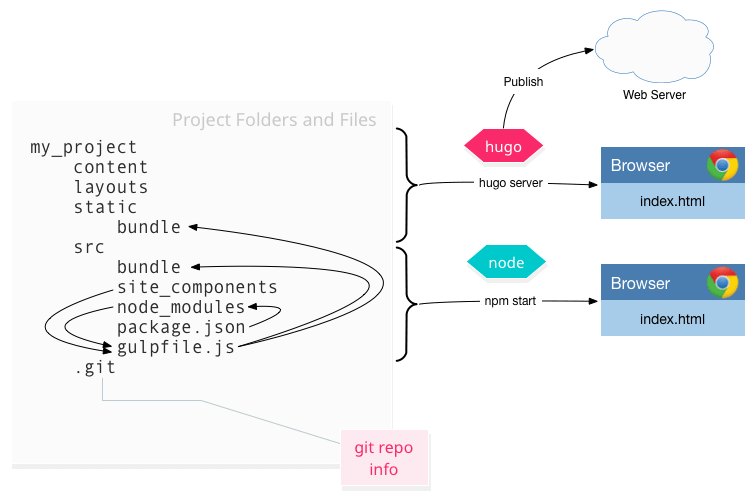
Once the test pages are looking good with the structure and style I want, I convert to Hugo templates. Hugo templates reference the gulpfile-generated bundle files, which are recompiled every change I make to the components. The Hugo web server is then showing me what the final site will look like. When I’m ready to publish, I use the hugo command to merge everything together, and make a published site folder for uploading.
Gulp.js is a well-developed and high performance system, that lets you “stream” your
CSS
and
js
files from one command to the next. The following code is part of my gulpfile.js. You can see the gulp task “css” is pulling in all the css files, making source maps for better debugging, concatenating them into one file, running it through postcss to inline modules, autoprefix, convert
CSS4
code, compress, and copy to the /bundle folders.
gulp.task('css', function () {
  return gulp
    .src(globs.css)
    .pipe(sourcemaps.init())
    .pipe(concat('bundle.css'))
    .pipe(postcss([
      atImport(),
      mqpacker(),
      cssnext({
        autoprefixer: {
          browsers: ['IE >= 9']
        }
      }),
      cssnano(),
      reporter({ clearMessages: true })
    ]))
    .on('error', handle)
    .pipe(sourcemaps.write('.'))
    .pipe(gulp.dest('bundle'))
    .pipe(gulp.dest('../static/bundle'))
})
For now:
- Stick to gulp, since it’s relatively easy to grok.
- Look at the diagram I made (click to embiggen) and see what’s connected to what.
6. Learn to code and compile
There are many ways you could move from here, but I think you couldn’t go wrong learning the compiled open source programming language “Go”, backed by Google. Two of the luminaries who designed C in the first place - Ken Thompson and Rob Pike - working with Robert Griesemer, designed and released Golang in 2009 to be great at the type of problems Google faces. If you’re interested in the cloud, Go is a modern language that works great for today’s environments.
Start by working through A Tour of Go, and referring to the docs. Try other tutorials like Go By Example or Go Programming Step by Step. Finally, here’s an excellent tutorial on how to build a web application in Go. For reference, here’s my pinboard on Go Resources.
Next you might find a couple of apps on Github, to fork and compile yourself. For example, a simple application to generate passwords on the command line, or, participate in the Hugo project!
For now:
- There are other compiled languages but, why go backward in time when you can start with something modern and well-supported like Go.
How to Continue
So, as this post is long, so the activities proposed require significant effort to get through. Once you get to a pretty good level, then, what should you do next?
A few ideas:
Find Good Projects
You should find good projects to work on. Use Github advanced search to find popular open source projects with a lot of stars, or a lot of active participation. Participate, learn newly, apply what you already know. Popular projects are welcoming, have strong guidelines and codes of conduct, and have good support.
In open source projects, most everyone is working for free, but, if you play your cards right and do what you can to participate in a positive way, you have a great chance of getting your questions answered. Just give back however you can.
Some good resources for learning are (the sometimes-hostile-to-newbies) Stack Overflow, or Treehouse and Codementor, and the concept of the #Askadev hashtag.
Learn Software Dev
There’s more to software development than assembly of pre-existing parts. One important step in a career in software is to learn about professional software development itself: it’s history, fundamentals, techniques, mechanics, back story. You’ve learned a bit of this already, if you’ve worked through the above steps.
You should learn programming fundamentals (not just buzzwords). This includes design patterns, architectural patterns, data structures, algorithms, optimization and some mathematics. You should also learn software development itself, including iterative development, version control, build automation, unit testing, system testing, end-to-end testing.
You should learn how developers work together in teams, by studying team development techniques and ways of thinking like Agile, Scrum, XP, Pair-programming. Read about “waterfall” to get insight into why those came about.
There are good, distilled “best practice” lists and general axioms, to help you create good software, such as:
- Adam Wiggins’ 12 Factor Apps (ebook)
- Rob Pike’s 5 rules of programming
- Don Roberts’ Rule of three
- Steve Mobley’s Programming Axioms
- Steve Souders’ 14 Rules for Faster-Loading Websites
- Simon Tatham’s How to Report Bugs Effectively
This is what I like to keep in mind myself:
Good code self-describes what it does. Good comments describe the why.
Good code self-describes what it does. Good comments describe the why.
- Apply Occam’s razor - the simplest solution is best. Simplify and don’t make it complex to try to be clever.
- Always clarify and test your assumptions.
- Did you spell it wrong? Computers are stupid, and do only what you tell them.
- Say the problem out loud, write it out with pencil and paper and solve it that way. Once it’s organized, you can commit it to code.
- Write software for normal human beings, to solve a problem.
- Tend toward the specific in programming (declare variables; never use dynamic typing)
- Break things into functions.
- Write good function names, variable names, parameter names to make your code easlier to understand in the first place. Add comments to help.
Learn from the Experts

There are some books and essays that should be on any software developer’s bookshelf. Take the time, read, and invest in yourself. In no particular order:
- Isaacson—The Innovators (learn the importance of women in software)
- Hofstadter—Gödel, Escher and Bach, an eternal golden braid “GEB”
- Richardson, Gwaltney—Ship It!
- Brooks—The mythical man-month
- Raymond—The Cathedral and the Bazaar
- Atwood—Coding Horror
- Torvalds—Just for Fun
- Toole—Ada, the enchantress of numbers
- Martin—Clean Code / Clean Coder
- Kerievsky—Refactoring to Patterns
- Souders—High Performance Web Sites
- Pirsig—Zen and the art of motorcycle maintenance
- Fowler—The Passionate Programmer
- Hunt, Thomas—Pragmatic Programmer
- Graham—Hackers and Painters
- Ladas—Scrumban
- Abelson, Sussman—Structure and Interpretation of Computer Programs
Take Care of your Career
In the end, if you’re going to have a career in software development, you need to be in control and know how to navigate it. To me, that means:
- Meet people and get connections. It’s not always about about know-how, but rather about “know-who”.
- If you’re working for yourself, learn how to write out a simple contract to get signed. Don’t be weak in this area.
- Learn to deal with politics. It’s part of life and any organization.
- Keep a journal and keep your goals clear.
- If you really know how to do something or fix something, and it’s not something with a big risk to the organization, just do it. If you’re always asking permission, many times you won’t get it, and if you proceed anyway, that brand is worse than if you had just done it without permission. Just don’t be stupid.
- You won’t have power or credibility, usually until you’re in your 30s. Learn what that means and how to work around it.
- Your seniors in the organization might not actually be stupid. Give respect, and earn respect yourself.
- Don’t kill yourself for the job. Exercise and take care of your body daily. Do the long hours only sometimes.
- “See, Do, Teach” is a good thing to remember. The teaching will help your understanding of a thing.
- If you fail, so be it. Don’t apologize for trying hard.
In Summary
Well, if you made it this far, congrats! That was pretty long, but I think it contains some useful information that I wish I had had when I was just starting out. It’s a fantastic time to be learning! Please share this, and let’s discuss in the comments.
Updates
- 24 Mar 2016 - added link to post on editor basics.
- 20 Feb 2016 - added acknowledgement for banner, hint about css debug with Pesticide.io.