Use Homebrew zsh Instead of the OS X Default
Keep your zsh up to date
If the zsh shell that Apple provides in Mac OS X is out of date, as it has been in Yosemite and El Capitan, it’s trivial to install the latest version, available on homebrew. Here’s a couple of steps you need to do to make that your default. Read on, for how to do it.
Initial Confirmations
Confirm the current active zsh version:
zsh --version
zsh 5.0.5 (x86_64-apple-darwin14.0)
Confirm the location of zsh:
which zsh
/bin/zsh
OS X’s dscl command is a command line utility for performing operations on the Directory Services database.
OS X’s dscl command is a command line utility for performing operations on the Directory Services database.
Confirm the shell that’s set for your user:
dscl . -read /Users/$USER UserShell
UserShell: /bin/zsh
The . is short for localhost, and the $USER variable expands to your username.
In a previous iteration of this post, I mentioned looking into /etc/shells to find out what shells your OS X knows about. It’s not necessary to view or append this file, if you’re setting your shell with dscl like we’ll do below. It seems that /etc/shells is used to specify allowable user shells for users connecting via
FTP
, and it used to need to be edited to include any new shells, that you were going to change to using chsh.
Upgrade zsh with brew


Assuming you have brew installed, use brew install zsh to install.
brew install zsh
==> Installing zsh dependency: gdbm
==> Downloading https://homebrew.bintray.com/bottles/gdbm-1.11.yosemite.bottle.2.tar.gz
######################################################################## 100.0%
==> Pouring gdbm-1.11.yosemite.bottle.2.tar.gz
🍺  /usr/local/Cellar/gdbm/1.11: 17 files, 532K
==> Installing zsh
==> Downloading https://homebrew.bintray.com/bottles/zsh-5.0.7.yosemite.bottle.tar.gz
######################################################################## 100.0%
==> Pouring zsh-5.0.7.yosemite.bottle.tar.gz
==> Caveats
Add the following to your zshrc to access the online help:
  unalias run-help
  autoload run-help
  HELPDIR=/usr/local/share/zsh/help
==> Summary
🍺  /usr/local/Cellar/zsh/5.0.7: 1084 files, 11M
brew install zsh  3.27s user 2.47s system 43% cpu 13.173 total
Confirm brew’s zsh location
Apple provides /usr/local for OS X users to install packages to and it’s already in your system path, so that’s where brew installs. Confirm it:
ls -la /usr/local/bin/zs*
  lrwxr-xr-x  1 rcogley  wheel  27 May 16 10:54 /usr/local/bin/zsh@ -> ../Cellar/zsh/5.0.7/bin/zsh
  lrwxr-xr-x  1 rcogley  wheel  33 May 16 10:54 /usr/local/bin/zsh-5.0.7@ -> ../Cellar/zsh/5.0.7/bin/zsh-5.0.7
But you can also use brew commands to confirm the details about the package:
brew list
  aspell		automake	enscript	gettext		gsl114		libgpg-error	mtr		rsync
  autoconf	bazaar		gdbm		go		jenv		libksba		pcre		zsh
brew list zsh
  /usr/local/Cellar/zsh/5.0.7/bin/zsh
  /usr/local/Cellar/zsh/5.0.7/bin/zsh-5.0.7
  /usr/local/Cellar/zsh/5.0.7/lib/zsh/ (35 files)
  /usr/local/Cellar/zsh/5.0.7/share/info/ (7 files)
  /usr/local/Cellar/zsh/5.0.7/share/man/ (17 files)
  /usr/local/Cellar/zsh/5.0.7/share/zsh/ (1036 files)
And…
brew info zsh
  zsh: stable 5.0.7 (bottled)
  http://www.zsh.org/
  /usr/local/Cellar/zsh/5.0.7 (1084 files, 11M) *
  Poured from bottle
  From: https://github.com/Homebrew/homebrew/blob/master/Library/Formula/zsh.rb
  ==> Dependencies
  Required: gdbm ✔, pcre ✔
  ==> Options
  --disable-etcdir
	Disable the reading of Zsh rc files in /etc
  ==> Caveats
  Add the following to your zshrc to access the online help:
    unalias run-help
    autoload run-help
    HELPDIR=/usr/local/share/zsh/help
Use the brew zsh


To use the zsh that brew installed, use dscl.
sudo dscl . -create /Users/$USER UserShell /usr/local/bin/zsh
Password: *********
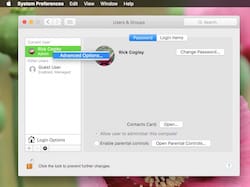
After that, restart your Terminal to have it take effect. You can also use System Preferences. Open Users & Groups, ctrl-click your username, then select “Advanced Options”. You can select your shell in there.
Now if you run which again, you’ll see the system is recognizing the one you installed:
which zsh
  /usr/local/bin/zsh
And confirming the version again shows:
zsh --version
  zsh 5.0.7 (x86_64-apple-darwin14.0.0)
In standard linux, and in previous versions of Mac OS X, you would add a new shell like /usr/local/bin/zsh to /etc/shells, then use chsh -s /usr/local/bin/zsh to change to it.
In standard linux, and in previous versions of Mac OS X, you would add a new shell like /usr/local/bin/zsh to /etc/shells, then use chsh -s /usr/local/bin/zsh to change to it.
Et voilà! The zsh that is first in your path is now the upgraded version from brew.
Confirm You’re Running Brew zsh
Now you can confirm which shell you are running with a couple of different commands.
First, repeat the command you used above to confirm:
dscl . -read /Users/$USER UserShell
    UserShell: /usr/local/bin/zsh
That’s the most precise way to confirm. Next, try echoing an environment variable (case matters):
echo $SHELL
    /usr/local/bin/zsh
It should be the same result. Finally, check the name of the running process by doing echo $0. It should return -zsh.
Set Shell within Terminal App
Get iTerm 2 if you haven’t got it already. The version 3 beta is especially good, as of April 2016.
Get iTerm 2 if you haven’t got it already. The version 3 beta is especially good, as of April 2016.
You can also set the shell within your terminal app, though I haven’t tested this, and am not sure if there’s any negative aspect to doing so.
- OS X Terminal - Preferences, General, “Shells Open With” and set the path to your preferred shell.
- iTerm 2 - Preferences, Profiles, General, Command.
I believe what this does is to store the selection within a plist file for that app, and ignore the user shell.
Handling Upgrades
There are a couple of considerations to keep in mind any time you upgrade OS X.
First, your shell might get reset, so check it to be sure.
Secondly, OS X El Capitan (v 10.11) has a new security system called “System Integrity Protection”, which is set up to be stricter with the security of /usr/local, among other things. Since this is where brew keeps its files, you’ll likely need to reset security on it by running the following command:
sudo chown -R $(whoami):admin /usr/local
If you upgrade brew using brew update or brew upgrade, it will inform you if there’s a problem with permissions on /usr/local.
Supercharging Zsh
It’s a matter for another post, but if you like zsh and want some cool tools for it, check out Oh My Zsh!, an open source framework for managing zsh config.
Updates
9 Apr 2016 - updated post to reflect more sure-fire way to set the zsh from the command line: use
dscl. Left information about/etc/shellsandchshin as an aside. Added information about selecting the shell in Terminal Preferences.25 Mar 2016 - checked version of
zshin OS X 10.11.4 El Capitan. It’szsh 5.0.8 (x86_64-apple-darwin15.0), which is still out of date and in fact, an even more pronounced version lag compared to thev5.2now being distributed viabrew. Added how to check which shell you actually are using, and a couple points about handling upgrades.24 Mar 2016 - cleaned up the post a bit. Added restarting Terminal, per comments (thanks!). Added ack section. Added link to Oh My Zsh!.
Thanks to Kirk Beard and Adam in the comments, regarding restarting Terminal to have the chsh take effect.
Thanks to Trent Lucier for pointing out to me that it can be set in your Terminal program’s preferences.